1

(49 replies, posted in Miniatures)

Sorry about posting to an old thread.  I figured the forum isn't fast paced enough for it to be a huge issue.

I've been making moulds of stuff I built and casting them with gypsum based putties for the last year and a bit.

I eventually settled on using silicone sealant, thinned with silicone oil (a non toxic alternative to naptha and easily available as it's used to put inside of shocks for RC cars), the curing accelerated with cheap acrylic craft paint.  The moulds are flexible and strong and I've cast them all atleast 10 times and they haven't degraded.

I'm finding the dental stone stuff easier to work with than resin.  I've been building my masters to be cast as one sided moulds, but have even had some luck making two part moulds and pouring them, plugging them and hand rotating for a slush cast.

I'll see if I can borrow a friend's digital camera, but sadly I don't have one right now.

2

(49 replies, posted in Miniatures)

I looked a bit more into admixtures.  I see what they're for now.  They should work marvelously with any gypsum based product.  Though with the break strength of excaliber on it's own, I can see why you might not bother.  Does the piece with the admixture have to cure overnight in the mold, or do you demold it first?

3

(49 replies, posted in Miniatures)

I used to add a decent amount of black acrylic paint to the water (the cheap stuff from the dollar store).  It was more for terrain stuff-- I wanted any part that chipped not to be glaringly white.  Worked quite well.   I didn't notice any change to the final pieces beyond colour.  Some people claim adding like 5-10% of the volume of the water in white glue gives the pieces a smoother finish and makes them more resistant to snapping.  There are also polymer additives for gypsum based cements you can get, but I don't know anything about those.

4

(25 replies, posted in Discussion)

Canadian here.  We had an election a short while ago.  No real changes resultant.  Just like the US (zing!!).  lol

5

(49 replies, posted in Miniatures)

I think even with slush/rotational casting with the resin, the excaliber will probably be quite a bargain.  Add in the longer mould life and the lack of noxious organic solvents and you may find yourself looking at resin as being the situational thing you'll grab only for certain models and mould types.

I'm contemplating getting some dental stone specifically made for rotational/slush casting.  Stuff that sets up quickly.  The dental supply place that's relatively local to me said they had some.  They said they have customers who are artists who buy the stuff to do hand rotational casting where the person turns the mould around by hand.  I love the sound of cheap, mostly hollow, strong gypsum casts at a low cost.  They also said that it'll work as a regular (albeit quick setting) casting stone. 

I'm hoping I can get dental stone to work in a two part mould.  I've never tried it.  I've only ever done a single sided cast with the stuff.

6

(49 replies, posted in Miniatures)

thedugan wrote:

Ahh.. you're a dabbler and pedant like me....

Exactly.

7

(49 replies, posted in Miniatures)

No, I've just worked in a lot of fabrication related jobs.  Etching glass, reproducing architectural features (like antique plaster trim on Victorian era houses) and stuff like that.  I've also done a lot of pottery, including slush casting with slip clay.  About 5 or 6 years ago, I also was involved in a start up company to sell wargames terrain online but we lost our first round of finished product in a shipping accident and neither myself nor my business partner had the money at the time to start again (refunding preorders sucks).  As well, since then the USD has really dropped and shipping costs from Canada to the US have doubled, so I don't feel so bad about that anymore-- we couldn't operate in today's environment as the US was our target market.  I'm also an information sponge kind of a thinker, so things like the fact that resin shrinks but plaster expands stick with me.  :shock:

8

(49 replies, posted in Miniatures)

thedugan wrote:

THAT is the information that I needed. A "foot wide cube" is like 7.48 gallons IIRC....that's a BUTTLOAD of resin, and answers my cost question. Unless the diestones are totally unsuitable for the model in question, I'm thinking that they are much cheaper for the given volume, given what you and Jim have said.

I just want to say that I wasn't being in any way accurate with that foot cube comment.  For all I remember, it could have been 9 or 10 inches (though I think it was bigger).  That makes quite a big difference once you're working out volume.  I'd ask for the dimensions/volume and mix ratios from any seller.  Find out exactly how much you're getting in true casting volume.

One of the problems with filling a slush/roto-cast resin piece with plaster is that plaster expands.  While not lots, you could get a crack in the resin shell from the pressure.  I know time is of the essence for many hobby pursuits, but I'd probably pour the inside of the resin shell in two stages, letting the plaster cure at least part way between the two.  My current thinking is to simply fill them with an expanding polyurethane foam or a plaster/die stone with lots of filler to keep the weight down.

And yes, you can slush/roto-cast with die stone and plasters.  It just takes a bit of patience.  Die stone that sets rapidly is obviously better than plasters that usually take longer.  I don't think it would work very well by hand.  You'd probably need to build some crazy roto-casting contraption.  Or be willing to sit there watching TV rotating a small mould by hand for half an hour.  If you get a die stone that is made for quick setting, you could probably get that down to 10 minutes.

Did you do the Hirst Arts thing? Most of the links that folks been putting up are familiar, I've been there before.

Yeah, I did some hirst arts blocks.  Took an awful lot of work/time unless you had multiple moulds or made moulds of blocks you wanted in higher quantities.  I always thought the Linka approach was better, where you cast wall pieces rather than individual blocks.  But that's the wrong scale for me, so I'll have to make my own wall moulds for 10mm/N-Scale buildings.

9

(49 replies, posted in Miniatures)

jimbeau wrote:

I'm slightly surprised the mold worked too.  But work, it did.

Did you affix the wooden hexigon to another surface and make a skin that goes wide around it?  Or does the mould end right at the hexagon?

Here's an example of what I'm talking about, step 9 and 10:
http://www.myheap.com/book/chapter-07/example-01/example-01.php

10

(49 replies, posted in Miniatures)

It's a totally different material to resin.  I'd recommend gettting a smaller amount if you're not familiar with it or know that you want to cast something definitely with plaster/die stone.

I'm heading the opposite direction.  I've worked with die stones and dental plasters and am just getting started with resins (started with cheap polyester resin from an autobody supply shop).

The last 50 pound box of die stone I bought was like a foot wide cube.  The die stone was bagged inside of that and filled the box up about 90% of the way.

Die stone feeds and feeds into water.  You'll be surprised at how much a given volume of water will absorb.

My general thinking is that plaster/die stone is better for some terrain and resin for miniatures.  Whether or not I'd go with resin or die stone would be a decision made on a case by case  basis depending on the shape of the piece and the nature of the mould.

Also, never dispose of plaster/water solutions down the drain.  Always let the plaster set completely and throw it out.  Sounds like a no brainer, but it's easy enough to forget and it only takes one time to block a pipe.  And even a really thin plaster/water solution will cause a build up over time.

thedugan wrote:

I'm not questioning that it worked, just whether or not it's the most cost-effective solution.

My thinking is that for a meteor, the rotating with polyester resin to make a mostly hollow cast might be the way to go.  Like the guy did with the rock casting on the taxidermy site.

Die stone is about strength rather than volume, so it takes a surprisingly high weight of dry powder to make a given volume of plaster.  So as far as cost effectiveness goes, if you can mix up polyester resin in small quantities and get good results with it, that'll probably be cheaper than die stone.  Die stone has the advantage of being all water based with no nasty fumes though.  And it's more sandable/workable than polyester resin.  Also, less heat is produced, so you can get a longer mould life.
11

(8 replies, posted in Wardogs)

I plan on upgrading my distribution with the release of Ubuntu 8.10 in a few days.  I haven't looked at whether or not this includes OO.org 3 or sticks with 2.4.

I find this changing how things are handled to be very strange.  I mean, the purpose of OO has always included Excel compatibility.  If I understand this correctly, this will make things less compatible with Excel files, which could well kill OO.org for a lot of users.

12

(49 replies, posted in Miniatures)

I've done a bit of casting (hirst arts moulds) with dental stone and it's quite strong.  I had this crazy micro resin bubble reinforced stuff with like a 20,000 psi break strength.  Bought it at a local dental supply place.  Check your phone book and give them a call.  Tell them you want to get some high psi (10,000+) dental stone.  Expect to pay about a dollar per pound.

I could spike the 20,000 psi stuff I had on concrete and I'd only get corners chipping off the blocks on a single throw.  Took a couple throws to make it shatter.  Thin pieces though, broke far more easily, that was an inch x half inch x half inch block.

It's not light though.

Clint Sales sells Merlin's Magic for hobby use.

http://www.clintsales.com/dental.htm

A tutorial sort of thing:

http://www.hirstarts.com/casting/dental.html

13

(49 replies, posted in Miniatures)

Amazing!!

I'm shocked it worked so well on a piece of lava rock.  I would have thought the silicone would have torn and the mould rendered useless.  That's amazing.

My thinking is that even if I get 5-10 casts out of a mould, for the cost and ease of getting the materials, that's worth it.

14

(14 replies, posted in Wardogs)

Got things a bit more specific.  Japan vs USA

The USMC (United Stars Mechanized Corps) will be generalists, with every mech having a variety of weapon systems to accomplish lots of differing roles.

The Dai-Nippon Teikoku Kaigun will be specialists, with mechs built for specific roles equipped for just that one task.

As well, they'll both have infantry, tanks and VTOLs.  Once again, the initial military doctrine will be one of generalists vs specialists here as well, with the DNTK having fighters and troop transports while the USMC has troop carrying VTOLs that are capable of fighting.

This combat doctrine split is just for starters.  I'm sure me and my buddies will want to switch things up and have the sides modify their doctrines as they learn more from the actions of the spreading war.  I'm sure it won't be too long before the Britannian Empire and the Neo-Sovs get involved as well.  The Stellaren Königreich has also been militarizing recently as well.

15

(14 replies, posted in Wardogs)

Well, I've decided.  I am going to go with WW2 in Space.  I know the background text in the rules has some of this leaning already, but with a more hard sci-fi modern feel to it.

I'm also going to be getting into WW2 historical gaming in the same scale, so I figured it's a no brainer.

16

(14 replies, posted in Wardogs)

Here's some shots of Spaceman Spiff's painted ones:
http://www.classicbattletech.com/forums/index.php/topic,38137.0.html
http://www.classicbattletech.com/forums/index.php/topic,35521.0.html
http://www.classicbattletech.com/forums/index.php/topic,35485.0.html
http://www.classicbattletech.com/forums/index.php/topic,36034.0.html
http://www.classicbattletech.com/forums/index.php/topic,36031.0.html
http://www.classicbattletech.com/forums/index.php/topic,32987.0.html

If you search/look through the general miniatures section of the CBT forums, you'll find spaceman spiff likes to photograph his miniatures in his city made up mostly of N scale buildings.  Pretty inspirational stuff.

17

(37 replies, posted in Discussion)

I'm running two 4th ed games and play in a 3rd (they're twice a month rather than weekly, so it's doable).

So far I like it.  It's really, really easy to DM.  I couldn't quite find a monster that had the right rules and description, so I just reskinned one.  It worked really well.  Things are well defined, but not over defined like 3.x was. 

I also like how I can gun for the players a bit more.  The monsters can fight pretty dirty and if you use the encounter design rules in the DMG, you'll never accidentally kill them off (this happened a lot to everyone in my old gaming group with older editions).  It's nice that when combat starts, I can actually play a little game myself rather than having to worry about running the combat in a way that won't either wipe everyone out or just fall apart because of how powerful the players are.

The game is definitely designed for dungeon type settings.  Right now one group is in a wilderness setting with a combined political and military thing going on (they're trying to unseat a dragon who rules a collection of towns and settlements without directly confronting the dragon because they're not yet strong enough to do that).  This means that the players can "nova" and use all their daily encounters without fear of needing them for another fight as they'll probably have time to rest.  At the end of the last session, I told all the players to keep track of what abilities they used as they may have another encounter before they can rest and get all their spells back and whatnot.

Experience points are not that same as they were.  Instead of being a reward, they are more like a pacing mechanic.  To set the pace from being a starting hero to becoming more of a demigod.  Leveling up is nice, but all the difficulties for things like skill challenges and encounters scale up as well, so it's more about setting a pace in a larger overall story arc than anything else.

18

(15 replies, posted in Wardogs)

Mine just arrived.  I ordered from EM4 rather than Red Shirt Games because I didn't need 30 of them and shipping from the UK was both cheaper and faster.  They arrived in 5 days from when I ordered them. From the UK to the west coast of Canada.  I have no idea why I can have things sent to me from overseas (got some stuff from Japan today as well) that's faster and costs less than stuff from inside Canada.

The actual detail on the pieces is deeper and crisper than I thought it was going to be.  As for using them in N Scale, they'll work, but they'll definitely be lighter mechs/power suits at about 5-6 metres tall.  The deep recesses will work well for my painting style as well, as I generally go with a base coat, dark wash, base coat again and then a highlight.

I haven't seen any of Iron Wind Metals recent releases for Classic Battletech, but these plastics strike me as being nicer and more detailed than the odd looking boxy stuff that was produced for Battletech under FASA.

19

(14 replies, posted in Wardogs)

Well, thanks to international mail starting to use teleporters, I got my N scale factory set from Japan and my mechs from EM4.  It's so strange that ordering stuff from Japan and the UK both costs less for shipping and is faster than ordering from within Canada.

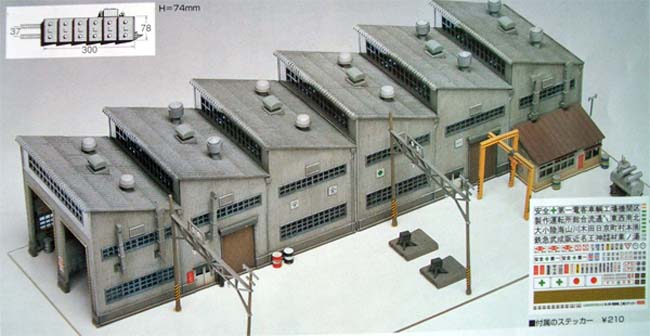
I also found out I ordered the wrong set for the Factory.  Instead of ordering Greenmax Kit, 37, I ordered 38.  Fortunately this is a happy accident.  Instead of getting a bunch of pipes and factory gubbins, I got twice the number of actual building pieces.

<IMG src="http://sunny-life.net/picture/greenmax/38b.jpg">http://sunny-life.net/picture/greenmax/38b.jpg</IMG>

The picture makes it look tiny, but the building piece is a full 3 inches wide and a foot long.  It can also be assembled as two 3" by 6" buildings.  There's also a few extra bits as shown in the picture.

For some reason when I thought about N scale being twice the size of 1:285/1:300/6mm, it never fully donned on my that twice the linear dimensions means 4 times the footprint/actual size.  I thought I was going to be spending hundreds over the next few years to get the amount of table space covered with buildings that I wanted.  With it being twice as big as I thought, and the greater size of roads and allies between the buildings, I'm going to need a lot less to make my little industrial/transport hub than I thought.  This also means that the model train stuff I'm going to by is going to take up more space than I thought, so I'll probably have to get less track as well. 

The EM4 mechs arrived as well.  5 days from ordering to arrival, from the UK to the west coast of Canada.  Amazing.  Orders from the same province as me don't get here in 5 days unless they're practically local.  They are definitely a higher quality than the pictures on their site make them out to be.  Given that wardogs is primarily about mechs, I think I'll be working on these now and put the VTOLs aside until I get some infantry.

20

(49 replies, posted in Miniatures)

thedugan wrote:

Cool! more tools for the toolbox, and another confirmation of technique. How much did you thin it? What were your proportions?

3 parts silicone, 1 part naphtha based thinner.  It was enough to make it paintable with easy but no more.  One guy quoted on that myheap site says you could go 50/50 and it should still work.  My thinking is to not thin it any more than necessary though.

I found that diluting it with Mineral Spirits much would result in the mold curling up if the mold was thin in cross-section.

Did you also add a catalyst?  I also just painted the mixture onto some glass to see how thin I could get it and the 3:1 silicone/naphtha with paint as a catalyst didn't deform, even at the edges where it was thin enough to be translucent.  I forgot about the mould release though and couldn't get it all off the glass (which is made from sand/silica, so silicone sticks to it).  I'm going to get some cheap corrugated plastic "for sale" signs at the dollar store for future mould box use.

Watered down white glue/Elmers (PVA glue for the Brits out there) or shellac should do the trick.

We ended up postponing the trial mould making after it came to light that some of his pieces will require a two part mould.  So we're going to need some non-sulfur clay for that process.  It's going to be a challenge, combining brush on mould making with the techniques for making a pourable mould.  I think we'll give the PVA a go.  Vegetable oil spray seems to be working fine as a mould release agent off of the glass and sprue I've tested the silicone on so far.

21

(14 replies, posted in Wardogs)

Well, the next thing I need to do is to figure out what to do for my mechs as far as colour scheme and theme are concerned.

Part of me wants to go with a WW2 across space theme.  The pros are rather obvious-- colour schemes are set, lots of historical decals available if I want them, lots of N-scale and 1:144 infantry and vehicles I can use and so forth.

22

(18 replies, posted in Wardogs)

Thanks for the link.  What an odd process.  You'd figure right by the rating, they'd have a button that's like "rate this game" or something.

23

(18 replies, posted in Wardogs)

It's hard to get a high rating there.  7 isn't bad at all.  I have no idea how to rate things on BGG.  I sign in, but don't see any obvious area to rate things.  I don't know if you need a certain level of account, or have to put the game into your "own" list first or what (however you do that).  It's not the easiest site in the world to use.  If I ever do figure it out, I'll rate Wardogs as well after I've gotten a few games in.

I plan on converting the heavy gear stuff to wardogs, but it's not high on my list.  I'm not sure when I'll be getting some of the gears in and likely won't have the drive to do a lot of converting work for stuff I won't use yet.  When I do it though, it'll be the stuff in their latest version of the rules (Blitz Locked & Loaded).  I don't have the massive amount of books they've come out with in previous editions.  Except the aerotech one.  I have that.

24

(14 replies, posted in Wardogs)

I was also thinking their 15mm power armour might work well also (for, well, power armour).  They have a variety throughout their 15mm Stargrunt range.

25

(49 replies, posted in Miniatures)

Well, I gave the process a test.  I used it on some model kit sprue I had because they had some really fine pressure pin lines and I wanted to see if it would pick them up.  I tried the method above (straight silicone for the first layer) but I didn't like the process.  It was a major pain to work with.

So I tried the tinned method.  Much better.  But too slow to cure.  The post on that Myheap site said that using glycerin or paint with the thinner would make it lumpy and that it was counter productive.  But I tried it anyway.  I thinned down some silicone caulk with some camp fuel (naphtha white gas) and added glycerin and paint.  It didn't turn lumpy at all.  I painted it on (and it went on easily when thinned) and set the sprue chunk aside.  It cured fast and normally.  It didn't lump up or shrink or anything.  Naphtha as a thinner and glycerin and paint as a catalyst work together just fine.

My friend has some plaster blocks in which he carved a stone pattern that we wants to test it on, so I'm going to do that Saturday.  Plaster is pretty porous, so I'm going to have to do some reading on how to properly seal it.

Oh, and the silicone replicated the detail just fine.  It even picked up some pin indents that I couldn't see with my naked eye.  I saw them when I looked through a magnifying lense and thought something was wrong with the mould and then grabbed the sprue and saw them on the sprue itself.

I've always not bothered doing much more than the occasional conversion because I thought replicating what I made wouldn't be economical.  But now... now there's scratch building to be done.